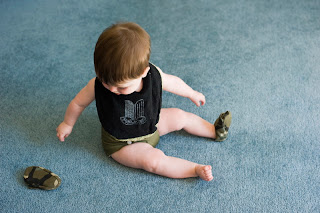
These boots are made for walking. Except they are shoes, and they are not really made for walking, rendering the initial statement a complete fallacy. I believe that is what's known as 'creative license'.
1. Cut outer and lining for both left and right shoe. I wanted a cushioned sole, so I cut out some padding also - that's the blue wool. You will also need some elastic and domes or buttons or another fastening of your choice.
2. With right sides together sew outer to the lining. The big notches show elastic placement.
3. Trim and notch the seam allowance.
4. Turn the right way out and press thoroughly.
5. Insert elastic and stitch to the lining at both ends
6. Holding the fabric taut in front and behind the feeder dogs, stitch the elastic casing. Be careful not to catch the elastic. The next step should be top-stitching these, but I got over-enthusiastic about getting the shoes finished that I completely forgot to do so.
7. Sandwich the padding between the outer and lining of the soles and tack in place to stop the three layers from shifting during machine sewing. Contrasting tacking thread is easier to pull it out after machine sewing. Tacking is a very underrated construction technique. Just pretend that it's couture sewing.
8. To attach the soles to the tops, start by joining the points marked "1" on the pattern and carefully pin around until the points marked "2" match. Pinning around the edge of the heel is pretty tricky because it's such a tight radius. Tack in place and remove pins.
9. Machine sew the seam. I used a narrow seam allowance with the edge of the machine foot as a guide.
10. Zigzag or overlock the edge. You can also bind it with some binding tape, but I was too lazy for that.
11. Turn shoes the right way out. Aww, they would look so much better with some top stitching.
12. Attach your fastening. I went nuts with the domer again.
Baby shoes are easy to make and because they are, by definition - little, they can be made from scrap material. The tracing of the baby foot inside the shoe footprint should give you an idea of the size.
1. Cut outer and lining for both left and right shoe. I wanted a cushioned sole, so I cut out some padding also - that's the blue wool. You will also need some elastic and domes or buttons or another fastening of your choice.
2. With right sides together sew outer to the lining. The big notches show elastic placement.
3. Trim and notch the seam allowance.
4. Turn the right way out and press thoroughly.
5. Insert elastic and stitch to the lining at both ends
6. Holding the fabric taut in front and behind the feeder dogs, stitch the elastic casing. Be careful not to catch the elastic. The next step should be top-stitching these, but I got over-enthusiastic about getting the shoes finished that I completely forgot to do so.
7. Sandwich the padding between the outer and lining of the soles and tack in place to stop the three layers from shifting during machine sewing. Contrasting tacking thread is easier to pull it out after machine sewing. Tacking is a very underrated construction technique. Just pretend that it's couture sewing.
8. To attach the soles to the tops, start by joining the points marked "1" on the pattern and carefully pin around until the points marked "2" match. Pinning around the edge of the heel is pretty tricky because it's such a tight radius. Tack in place and remove pins.
9. Machine sew the seam. I used a narrow seam allowance with the edge of the machine foot as a guide.
10. Zigzag or overlock the edge. You can also bind it with some binding tape, but I was too lazy for that.
11. Turn shoes the right way out. Aww, they would look so much better with some top stitching.
12. Attach your fastening. I went nuts with the domer again.
13. Put shoes on baby and see how long they stay on.
 |
| Mmm tasty shoe |


5 comments:
Looks cute! The tutorial you shared sounds easy. I can try and make one for my baby. I just hope i will do it right. Thanks for sharing.
Trial and error is great when it comes to baby clothing because it's so little, and you don't waste too much material with mistakes=]
I want to make a pair of baby shoes for my little daughter.
Excellent post. You talk about nice shoes. this shoes is best with this situation. But you must know about plantar fasciitis. Some footwear protect us from plantar fasciitis. so be careful about walking shoes for plantar fasciitis. Thanks with this post. I am waiting for your next post.
Post a Comment