

Make your own super-hero undies! And then wear them as togs!
 DIY costumes:
Super Maker: black cape, black Ponoko t-shirt, red super-maker undies
Super Pooper: white onesie with a poop and flies applique, white and neon yellow cape (it's really an over sized bib)
- Dress-ups are silly. We don't do silly in this house.
- Pffftt, this is someone else's house.
- Oh, go nuts then.
Super Pooper's cousin turned five and celebrated that little milestone with a super hero party. In a tumultuous sea of squealing, sugar-crazed little Batmen, Spidermen and Supermen (or either gender), we looked more like super-villains, which was certainly a role to relish and a good excuse to steal candy from babies.

Everyone knows that the most important piece of attire for even the most sartorially challenged super hero, is undies worn on the outside.
Superhero undies are super easy to make. Like taking candy from a baby, but without the screaming.
YOU WILL NEED:
1. Firstly, make a pattern using your best fitting undies or togs. Lie them flat and trace each part onto tracing paper or sew-on interfacing. Your tracing may be a little rough, so tidy it up using your ruler/flexicurve/french curve and cut out the pieces. You will have three pattern pieces: back, front and a gusset. I drafted the back and front and 'place on fold' pieces because I got stingy with the paper. However, it's just as precise to draft the pieces on paper folded in half, and then unfold them after cutting out. This will ensure precise symmetry.

2. Cut out each pattern piece twice. You will essentially sew two pairs of undies and join them together. For each "pair" overlock the back piece to the front piece and then attach the gusset. If your fabric has a right and wrong side, remember to sew right sides together. You don't want to be doing too much unpicking of overlocked stitching.
3. Time to sew on the belt loops onto the right side of the outer undie pair. If you want a reversible pair, repeat steps 3-5 with the other pair. The loops need to be long enough for your belt to fit through +1cm seam allowance. I used five belt loops, spaced evenly along the perimeter. Pin the first belt loop to the centre back and then add the others. If you fold the garment in half along centre back and centre front, it's easier to space out the loops evenly. Use the smallest zigzag stitch to sew on the bottom end of the loops.

4. Fold the loops upwards towards the waist and pin in place.

5. Attach the top ends of the loops to the top edge of the undies. You can use a zigzag stitch or whatever because all you're trying to do here is hold the loops in place for the next step.

6. With right sides together, overlock the inside pair to the outside pair along the top edge. I guess that edge is usually called "waistline", but these are super-low hipsters. Personally, I pin the edges together first and remove the pins as I sew. Obviously with overlocking you need to take extra care with that. I use my supermaker powers.
7. Nearly done...
Turn your almost completed undies the right way out and then simply overlock the edges of the leg holes. Again, I pin first to make sure that the lining and outer seams are perfectly matched. Here the wooly nylon thread really makes a difference, giving a well bound edge.
 |
| Unleash your inner super hero! |

Super Maker: black cape, black Ponoko t-shirt, red super-maker undies
Super Pooper: white onesie with a poop and flies applique, white and neon yellow cape (it's really an over sized bib)
- Dress-ups are silly. We don't do silly in this house.
- Pffftt, this is someone else's house.
- Oh, go nuts then.
Super Pooper's cousin turned five and celebrated that little milestone with a super hero party. In a tumultuous sea of squealing, sugar-crazed little Batmen, Spidermen and Supermen (or either gender), we looked more like super-villains, which was certainly a role to relish and a good excuse to steal candy from babies.

Everyone knows that the most important piece of attire for even the most sartorially challenged super hero, is undies worn on the outside.
 |
| A brave, brave man... Super "P" may or may not denote a super methamphetamine manufacturer |
YOU WILL NEED:
- overlocker!
- tracing paper or similar
- pattern drafting tools: set square, flexi-curve or french curve should be sufficient for this
- fabric (see notes below)
- thin webbing or strong nylon ribbon for the belt loops.
- wooly nylon thread for the bobbin on the sewing machine and one of the lower loopers on the overlocker
- two-way stretch elastane (usually known as lycra) is a really good material to use because then you can wear your super-hero undies as togs.
- you can use a different colour fabric on either side because it's only a tiny tiny bit more effort to make the undies completely reversible.
- if you're making them as reversible togs, choose colours and or patterns that won't become see-through and clash when wet.
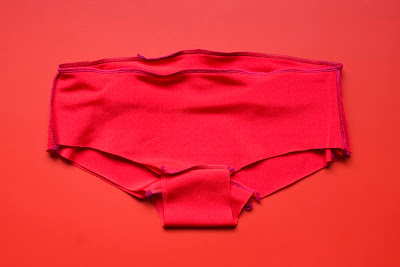
1. Firstly, make a pattern using your best fitting undies or togs. Lie them flat and trace each part onto tracing paper or sew-on interfacing. Your tracing may be a little rough, so tidy it up using your ruler/flexicurve/french curve and cut out the pieces. You will have three pattern pieces: back, front and a gusset. I drafted the back and front and 'place on fold' pieces because I got stingy with the paper. However, it's just as precise to draft the pieces on paper folded in half, and then unfold them after cutting out. This will ensure precise symmetry.

2. Cut out each pattern piece twice. You will essentially sew two pairs of undies and join them together. For each "pair" overlock the back piece to the front piece and then attach the gusset. If your fabric has a right and wrong side, remember to sew right sides together. You don't want to be doing too much unpicking of overlocked stitching.
 |
| Inner, outer and belt loops |

4. Fold the loops upwards towards the waist and pin in place.

5. Attach the top ends of the loops to the top edge of the undies. You can use a zigzag stitch or whatever because all you're trying to do here is hold the loops in place for the next step.

6. With right sides together, overlock the inside pair to the outside pair along the top edge. I guess that edge is usually called "waistline", but these are super-low hipsters. Personally, I pin the edges together first and remove the pins as I sew. Obviously with overlocking you need to take extra care with that. I use my supermaker powers.

7. Nearly done...
Turn your almost completed undies the right way out and then simply overlock the edges of the leg holes. Again, I pin first to make sure that the lining and outer seams are perfectly matched. Here the wooly nylon thread really makes a difference, giving a well bound edge.
 |
| Monkeys have red bums, too! |
No comments:
Post a Comment